Divot filling vs replacement
Neil Radatz, CGCS, Hawk's Landing Country Club, Verona, WI:
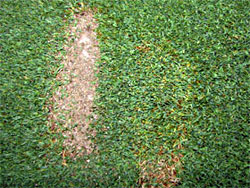
 "Over the last few weeks we have gone through a lot of divot mix for the fairways and tees. This is a great thing and your effort is much appreciated, but I also feel that there are many divots that can be very easily replaced instead of filled with divot mix. In the photos below I took three shots into a green; the left and middle full shot with a big divot, while the right side just a scalp with no divot taken. "Over the last few weeks we have gone through a lot of divot mix for the fairways and tees. This is a great thing and your effort is much appreciated, but I also feel that there are many divots that can be very easily replaced instead of filled with divot mix. In the photos below I took three shots into a green; the left and middle full shot with a big divot, while the right side just a scalp with no divot taken.
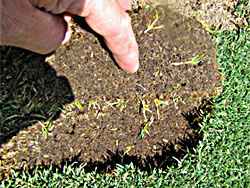
After one week the replaced divot is completely rooted down and the filled divot has just germinated. It would take most likely another seven days for complete fill in. This shows that if you can replace your divots, do so. If there is not enough sod to fill the void then fill with the divot mix."
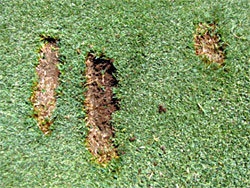
Two divots taken and a scalp. July 8 |
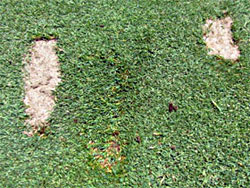
The center divot is replaced;
the other two filled. July 8
|
Notice rooting of replaced divot. July 11 |
After one week the replaced divot is completely rooted down while the filled divot has just germinated. July 15
|
Visit Neil's blog at http://hawkslandinggreens.blogspot.com
|
 |

Some new sand...
Craig DeJong, Hendersonville Country Club, Hendersonville, NC:
 "A few of our bunkers have received additional sand. Luke Sweeterman, our Equipment Technician, fabricated a tool to measure the depth of the sand in all of the bunkers. It was used to show us where we were less than 5" deep. Four bunkers were indentified as needing additional sand. (Greenside bunker on #1, greenside bunker on #6, left greenside bunker #15 and the right greenside bunker at the practice area.) We used a mechanical rake and water to help the sand settle and firm up. It will take a few good rain events for the consistency to equal the other bunkers on the course.
 Our depth tool.
|
 Adding sand.
|

Applying water to help firm up the sand.
|

Final product.
|
Visit Craig's blog at http://hccgcgd.blogspot.com>
|
 |

A cool look at a greens mower...
Chris Tritabaugh, Northland Country Club, Duluth, MN:

"My guess is most golfers have, at some time, stood and watched a member of the turfgrass staff walk-mow a green. It's almost as mesmerizing as watch a Zamboni, trouble is it happens way too early in the morning for people to see. While we have all watched these machines moving over the putting surface leaving behind a beautiful cut, it's unlikely most have given any thought to just exactly how these mowers cut the grass so low and so perfectly. Friday I was out on the 18th green adjusting the out-front brush on one of our walk mowers. I got down on my hands and knees to look at something and realized that I had a very cool photo staring me in the face.
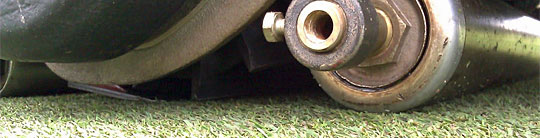
There are a number of things to see in this photo.
The smooth front roller. You can also see the back roller of the cutting unit on the very left of the photo. Our walk-mowers, the Toro Flex-21, have three rollers; two on the cutting unit and the rear drum, which drives the unit across the green. We use only smooth rollers on all of our reel mowers. The smooth surface drastically reduces surface disruption and plant stress. Between the two rollers you can see the business areas of the cutting unit; the reel and bedknife. Unlike the rotary mowers you use on your lawn, which spin a sharp blade at a very high rate, reel mowers cut the grass blades like a scissors. The bedknife (the very end of which is visible) is stationary and forms one blade of the "scissors" as it moves just over the surface of the green. The spinning blade of the reel forms the other blade of the "scissors". "Our mowers are set up such that the reel and bedknife are not quite touching each other. The gap between the two is about the thickness of a piece of paper..." |
The reel on this mower has 11 blades and spins to continually clips the blades as the mower move across the green. The relationship between the reel and the bedknife is everything when it comes to producing a quality cut. Our mowers are set up such that the reel and bedknife are not quite touching each other. The gap between the two is about the thickness of a piece of paper. After each mowing the reel to bedknife set-up is checked, as well as the height of cut. A poorly set up mower results in the grass blades not being cut cleanly, which can result in: poor putting conditions, increased need for fertility and water, as well as an increase likelyhood of disease. The spinning of the reel throws the clipping into an attached basket where they are collected. When conditions are just right a single mower will collect a half basket or less of clippings per green.
As you can see in this photo, the mowing of a putting surface happens on a very small scale. The cutting height on greens is currently .115 inches, just above 1/10 of an inch. At these heights any problems with the reel to bedknife set-up can cause big issues with the quality of the putting surfaces. Next time you watch that mower cutting a perfect line across a green you will have a little better idea of just how it works.
Visit Chris's blog at http://northlandgrounds.blogspot.com |
 |

Sprayer Pre-Mix Tank
Justin Parker, Equipment Tech, Stow Acres Country Club, Stow, MA:
 "One of the most important cultural practices here at Stow Acres Country Club is spraying our greens, tees and fairways. On average, we spray twice each week. We have two dedicated sprayers, one 175 gallon Spraytek DS175 for greens and tees, and a 300 gallon Toro Multipro 5700 for fairways. Given the volume of the tanks, and the precision with which the sprays are mixed, it can take upwards of an hour to fully load the sprayer. Each spray is typically 2-3 loads, which requires 2-3 hours or more of mixing and loading the spray. This season, we decided to change the process up a little.
We built a Pre-Mix Tank to facilitate mixing the spray while the spray technician is in the field treating the turf. The first step in the process was selecting a tank. We used a 275 gallon bulk fertilizer tank. 275 gallons of water, at 8.35 lbs per gallon, weighs 2300 lbs. With this in mind, we built a pressure treated stand of the same design as a hot tub deck. The stand also includes an area to stand on while loading the mix.
The tank was then modified to fit our design. We cut in a bulkhead with straining screen. The mix tank is powered by a 3/4 hp sump pump that drives a sprayer fill valve, in line strainer screen with bypass, and agitation nozzles to keep the products adequately mixed prior to loading. The tank is filled from our 120 psi South Course irrigation. An inline strainer screen filters the water before entering the tank. A custom aluminum fill hose frame was built and hinged to the tank. To facilitate the arm swinging without binding the fill hoses, we installed swing joints at both pivot points (upper and lower fill hoses). A platform was mounted to the tank cage with a cutout for the calibrated mixing cup.
Once we started using the mix tank, the time spent by the spray technician at the shop between loads has decreased from an hour or more, to only 5 minutes.


|
UPDATE: After using the mix tank for a couple weeks, we added a few new features to make it more usable. To facilitate faster filling, we plumbed the irrigation water from the South Course directly into the tank. Filling the entire 275 gallon tank with the irrigation line takes under 5 minutes. To help screen out any of the debris that makes it through the irrigation lines, we installed a fine mesh strainer screen. There’s also a quick disconnect in line, in case we ever have to move the tank for some reason. In the event that the irrigation is not pressurized, a 3/4″ female hose thread swivel connector was installed to allow the hose from the well water to be hooked up to the fill line.
For ease of rinsing containers and the mix tank itself, we also installed a 6′ hose with quick connect and a nozzle to the fill line. Valves allow one or both to be operated at the same time.
Visit the Stow Acres blog at http://stowacresturf.com and Justin's personal blog at http://golfcoursetech.wordpress.com.
|
 |

Topdressing...
Steve Cook, CGCS, Oakland Hills Country Club, Bloomfield Hills, MI:

"Today we topdressed the North greens.
Topdressing with sand is the most effective means of diluting thatch on putting surfaces. There are additional benefits:
smooths the putting surface helps eliminate or minimize "grain" provides a firmer surface
Light and frequent topdressing is preferred as long as there is access to the golf course to get it done. We avoid topdressing on days when the temperatures are in the high 80's or low 90's due to the abrasive stress on the turf."
Visit Steve's blog at ohccturf.blogspot.com
|
 |

Bird Houses???
Joel Kachmarek, Tacoma Country and Golf Club, Lakewood, WA:
 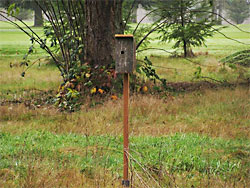
"You might have noticed that all of a sudden we have bird houses in the native area between 11 and 16. This is not an attempt to attract birds although they are real bird houses and I suppose we might get birds taking up residence. In fact these bird houses are simply markers. The native areas on the course were once maintained areas and therefore have irrigation installed in them. The bird houses mark where we have isolation valves and sprinkler heads.
No matter how often we try and locate and trim around these boxes, we always have trouble finding them in the long grass. With the bird houses, it will be easy to quickly locate a valve which is really handy when a sprinkler head needs repair. This next picture shows a bird house near the 18th tee.
 This photo is not a real birdhouse...
|
 It is actually a sprinkler head on a riser that is disguised as a birdhouse.
|
This was designed so the water stream would get over the surrounding shrubs which are getting taller and taller. The post for the birdhouse is actually the pipe feeding the sprinkler head. As the shrubs get taller, it's quite simple to just change out the pipe to a longer one if more height is needed.
Visit Joel's blog at www.tacomaturf.com.
|

|
 Look who's stylin' now! Josh Clevenger, golf course superintendent at Claremont Country Club in Oakland, CA, has a new blog theme with custom header courtesy of TurfNet. And while we didn't give a tip of the cap to a "Best Overall" this year, Josh's blog would certainly be at the top of the list. Check it out here. |
 |
|
About our Blog Aggregator: Many superintendents are now hosting private blogs to better communicate with their golfers and/or members. Beyond local weather and course conditions, there is a great deal of information about projects, methodologies and techniques that would be of value to other superintendents — hence our Turf Blog Aggregator. As every blogger struggles occasionally with content, we also include posts intended to educate golfers about turf maintenance for others to use as a template for their own blogs.
Miss any previous issues of TBA? You can find them all here.
Turf Blog Aggregator(TM) is a trademark of Turnstile Media Group.
|
|