

Frank Dobie first began rebuilding bunkers in 1967 at The Sharon Golf Club in northeastern Ohio. Chief agronomist and general manager at the club near Akron, Dobie has worked at Sharon for 50 years, and he's still constructing bunkers today the same way he was in 1967, bringing a whole new meaning to the phrase "If it ain't broke, don't fix it."
Dobie began reconstructing Sharon Club bunkers for the same reasons superintendents do so today: to avoid contamination of bunker sand, to retain color and consistency, to promote drainage, reduce erosion and minimize time spent maintaining bunkers.
The procedure developed by Dobie in 1967 reportedly is the first to utilize liners to protect the integrity of the sand. While this process (adapted here from a PowerPoint presentation) might be a little more expensive than other procedures, but it can be more reliable and cost-effective in the long run. The bunkers at The Sharon Club contain the same sand today that Dobie placed there during a 1967 reconstruction.

Other benefits of this procedure: Since the sand doesn't erode easily from the slopes, there is very little hand shoveling after a heavy rain; the absence of accumulated clay and silt in the sand eliminates the need for cultivation; the sand stays clean, so adding sand occasionally for appearance is unnecessary; the absence of small stone contamination in the bunker sand eliminates them being hit onto the green and causing mower damage; because the sand remains clean over time, it will maintain its original density and water percolation rate, draining quickly (within one hour) after a heavy rain without serious erosion, and sand on bunker slopes will remain firmer because it is not constantly being shoveled; the original sand that was put into the bunkers since 1967 has never been replaced, so replacement cost is eliminated.

Excavation
Dobie recommends using a backhoe fitted with a 3-foot smooth bucket, and the soil was used to create mounds around bunkers. The bunker cavity was pitched to the center of the bunker and an exit point for the tile line was established. A transit was used to check all grades.
After the surrounding grade was established, a vertical cut was made at least 14 inches deep with a backhoe. Three to 4 inches of topsoil was added to the surrounding area after the bunker sand was in place, making the edge depth at least 16 inches. The slope angle of the bunker cavity floor did not exceed 15 degrees which assures minimal sand movement.
All vertical edges are smoothed with a spade bar, and the bunker bottom is smoothed out with a box grader to eliminate the potential for water pockets.
A trench 2 feet wide and 8 inches deep was dug at the lowest area in the bunker cavity with 1 inch per 10 inches of fall to the exit point. The 2-foot trench filled with gravel serves as a reservoir until the 4-inch tile can drain it.
Construction
 When it was time to form bunker edges, Dobie used plywood sheets measuring 2 feet by 8 feet by 3/8 inches held in place by rebar. Topsoil was packed along the outside of the plywood, creating a smooth vertical bunker edge and promoting deep-rooted turf next to the vertical edge of the plastic liner.
 Perforated pipe, 4 inches in diameter, was placed over the 10 mil plastic (optional) covering the bottom and sides of the drainage trench. Y-shaped pipe and 45s were used for easy future access with a camera snake. The pipe was then covered with No. 57 gravel until the trench was almost full. The top of the gravel must be 2 inches lower than the rest of the bunker cavity.
In the event of future blockages, Dobie installed an inspection box, with two 4-inch risers, in the bunker's exit drain line. Ninety-degree sweep fittings were used on each riser so that a camera snake can be inserted into the line in both directions.
Filling the bunker
 The No. 57 gravel was covered with a 1-inch layer of pea gravel, blending it into the slopes of the cavity. If the bunker is on a hillside, it is extremely important to cover the entire bunker cavity floor with at least 1 inch of pea gravel. Dobie says it also is critical that the top of the pea gravel over the tile lines remains the lowest point of the cavity. Red marking paint was used to mark the tile trench so it could be visible through the plastic liner.
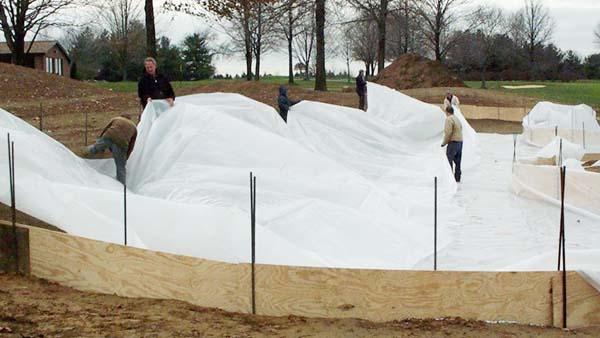
The cavity was then covered with 10 mil clear polyethylene. More than one sheet was needed to cover the area, so it was overlapped by 3 to 4 feet. Overlap like roof shingles so water does not go under the plastic.
Once in place, the plastic was stapled to the top and bottom of the plywood side boards with a few inches of excess plastic left above the plywood side walls. The red paint lines on the gravel were visible through plastic denoting where to cut four rows of 6-inch holes 6 inches apart directly over the entire trench. It is important to work out as many wrinkles as possible in the plastic before installing the sand.
 Small piles of sand were placed on the plastic around the edges to make sure the plastic didn't shift. Dobie warns against dumping a load of sand directly onto the site as it will cause the plastic to pull away from the edges. A total of 3 inches to 4 inches of topsoil was applied to the surrounding banks butting up to the plywood. The plywood showing above grade kept the topsoil from washing into the bunker sand while turf was being established.
Staples were removed from the plywood once the turf was established on the banks, rebar and plywood were removed and the plastic liner was trimmed around the edges 2 inches below the grass line so as not to be visible.
The slope angle of the finished sand was less than 20 degrees to minimize erosion. Still, intrusion of organic matter is inevitable, but that can easily be skimmed off with a flat shovel, says Dobie. As a result, all bunkers at Sharon can drain water within 30 minutes after a heavy rain event of at least 1 inch, even those filled in 1967.
For more information, or to get a copy of the PowerPoint presentation, please email Frank Dobie.